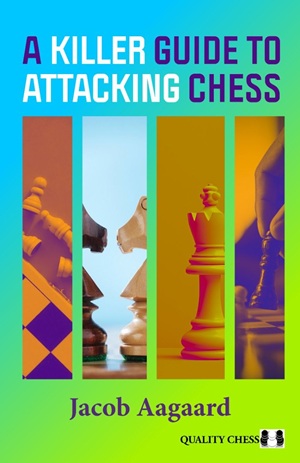
Jacob Aagaard is certainly no stranger to writing. He has already written roughly 25 to 30 chess books, covering countless topics along the way. Yet, as far as I can tell, he didn’t write many books about this fascinating subject. There is a book titled Attack & Defence (out of print), and if we dig further back into history, we encounter older material: “Attacking Manual 1 and 2″, but those books are out of print as well. So it was high time for something new.
Something new? It is turning into a completely new series. Regarding this book, Aagaard writes that he kept the number of variations limited and intended for it to be easily readable without a chessboard or computer—hence, with plenty of diagrams. As far as I am concerned, he succeeded brilliantly in this regard. The problem with many writings by strong chess players is often that they drown you in a sea of variations while offering far too little verbal explanation. To them, things are often self-evident, but not to the average club player. The author did not fall into this trap. I can easily follow it all without a board myself.
Another positive point is that he makes a clear distinction between various aspects of the game. For example: is tactics the same as attacking?
Well, no. Tactics and calculation can be found in all phases of a game. By no means does every attack start with tactics. It is primarily about managing to achieve a certain advantage on a specific part of the board. That can easily be accomplished through positional play as well. An attack, of course, often ends with some form of tactics.
He views an attack as a race. The attacker often has to risk everything to reach the enemy king first, frequently sacrificing material to do so. But if the defenders arrive first, we often end up regretting the investments made. If we accept the race as a given, we shouldn’t worry too much about what we knock over along the way. In short: time is of the essence. This kind of explanation neatly highlights what it is all about. You can also see this in the table of contents.
Chapters
- Momentum
- Include all the Pieces in the Attack
- Colour
- Material
- Attack the Weakest Square
- Attacking the Strongest Square
- Evolution/Revolution
- The Killzone
- Concrete is Underrated
Some examples
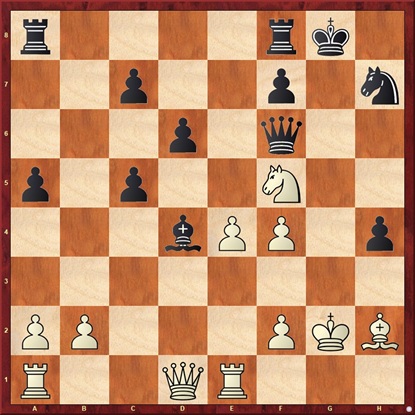
Below are a few examples from the book, such as from the chapter on momentum. The position below arose after an analysis of a game between Navara and Pechac. Aagaard’s commentary:
“Both kings are vulnerable, and both can seek cover behind the h-pawn. It seems impossible for White to create threats, especially given the silly bishop on h2. It looks more like a defender than anything else. Black will almost certainly play …Kh8 and …Rg8. And then it is White who has to be careful. But White has a powerful move at his disposal that seems pointlessly absurd at first glance.”
Do you see it?
Click here for the answer
24. Bg3!! This move forces Black to react. White threatens to capture on h4, which marks the starting signal for a devastating attack. This reduces Black’s options to just a single move. He has to accept the challenge. This is precisely what momentum is all about. White gains a tempo by sacrificing the bishop and clearing two of the three pieces from the h-file. The Black king is no longer safe there. 24…hxg3. There are no other sensible moves. 25. Qg4+ Kh8 26. Rh1. The White attack has quickly gained traction. Mate in three is threatened. Black has to give up his queen. 26…Qg6 27. Rxh7+ Qxh7. If Black takes with the king, White has a fork on h6. 28. Rh1. White has now created two threats. The first is to take on h7 and, via a series of checks, maneuver the queen through h5 and g5 to land on h6. The second is to play e4-e5, cutting off the bishop from defending g7. 28…Bf6. Black can try to prevent mate with 28…Rae8, but White then cuts off the bishop with 29. Rxh7+ Kxh7 30. e5! Tg8 is what Black would like to play, but this robs Black of an escape square and he still gets mated after 31. Qh5#. 29. Rxh7+ Kxh7 30. Qh3+ Kg8 31. Qh6! Followed by checkmate.
The Killzone
Another concept previously introduced by Aagaard is that of the “killzone.” It describes quite literally what it is all about. Rather than blindly checking the enemy king, the concept of the killzone centers on trapping the enemy king within a restricted perimeter. In short: the king is boxed in. Aagaard:
“Preventing the king from leaving the killzone is a vital weapon in your arsenal of attacking ideas!”
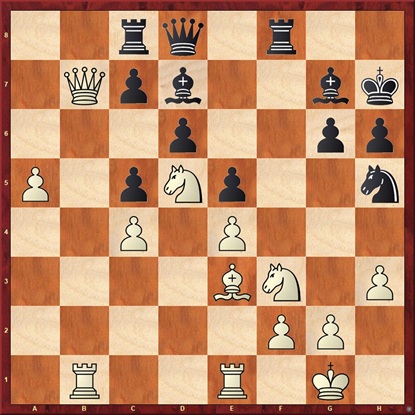
Take a look at the following diagram (blitz game between Bjerre and Abdusattorov). About this position, Jacob remarks:
“In the following blitz game, my former student (he means Abdusattorov) forgot what I taught him.”
Have a look for yourself—how could Black win here?
Click here for the answer
Black would be completely winning after: 21…Rxf3! 22. gxf3 Bxh3! The White king is powerless and trapped in the killzone. Black then plays …Qh4 followed by …Nf4 and …Rf8.
Instead, Black played 22…Qh4? and allowed the king to escape with 23. Kf1! After that, White was winning, though he later lost control and ultimately lost the game.
In summary, we can conclude that this is a fine and instructive book, packed with wonderful examples and, as befits an excellent trainer, well structured. There is also a workbook with exercise material written by Sam Shankland in collaboration with his personal trainer Jacob Aagaard. This material is also available as an Ebook or Chessable Course. I already started working through the Chessable Course and will report back on it soon.
Order: New In Chess
- Title: A Killer Guide to Attacking Chess
- Author: GM Jacob Aagaard
- Sample pages
- Number of pages: 272
- Publisher: Quality Chess
- Year: 2026
- Type: Paperback € 29,99 Hardcover: € 34,99
- Ebook € 23,19
- Also available as: Chessable Course

